Smart Editor Manual
1. Description
Smart Editor is a program for editing and creating MSI packages and MST transform files.
The purpose of the program is to easily edit create transform files for existing MSI packages, and to edit
and compile projects created using Smart Capture.
1.1 Features
- Edit existing vendor MSI packages easily and quickly
- Automatically detect and fix package compliance issues through customizable analysis templates
2. Installation
2.1.Prerequisites
Smart Editor requires the following applications installed on the target PC:
- Microsoft .NET Framework 4.6.2
2.2.Installation
Run the installation MSI for the appropriate version for your operating system (x86 or x64).
3. General
3.1. Opening or creating a package
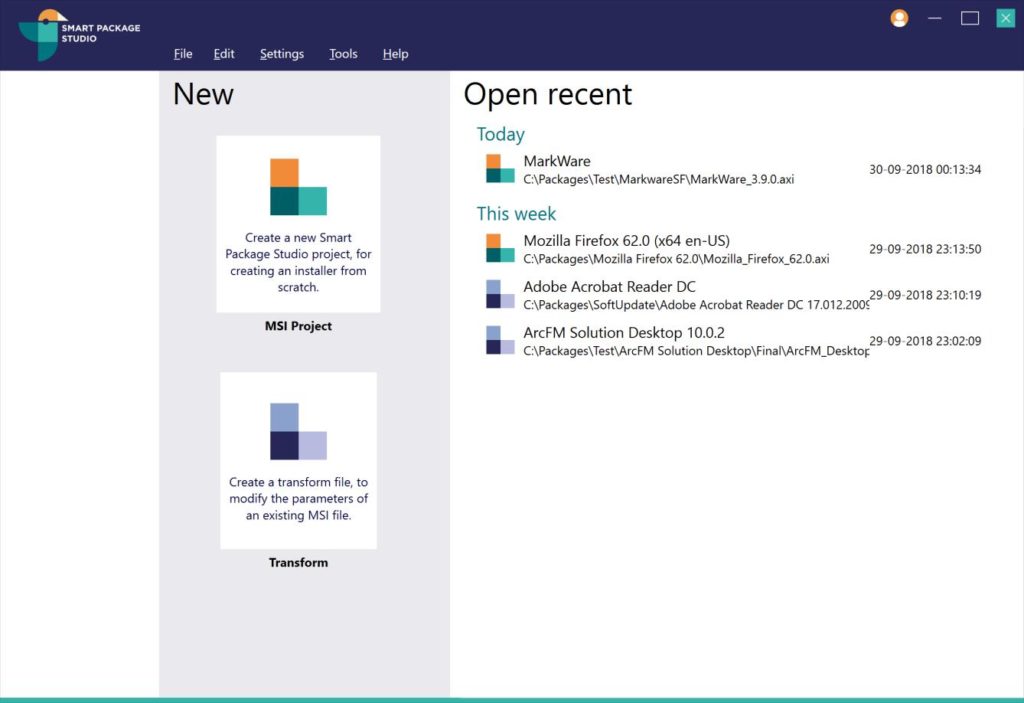
Upon opening Smart Editor, you have the following possibilities:
- Create MSI project: Creates a new blank Smart Package Studio project.
- Create transform: Opens an existing MSI package for creating a transform for it.
- Open recent package: Re-open a recently opened package.
3.2. Creating a new project

Creating a new project opens the above dialog, where basic information for the new package can be entered.
4. Main views
This section describes the most commonly used views in the program.
4.1. Overview
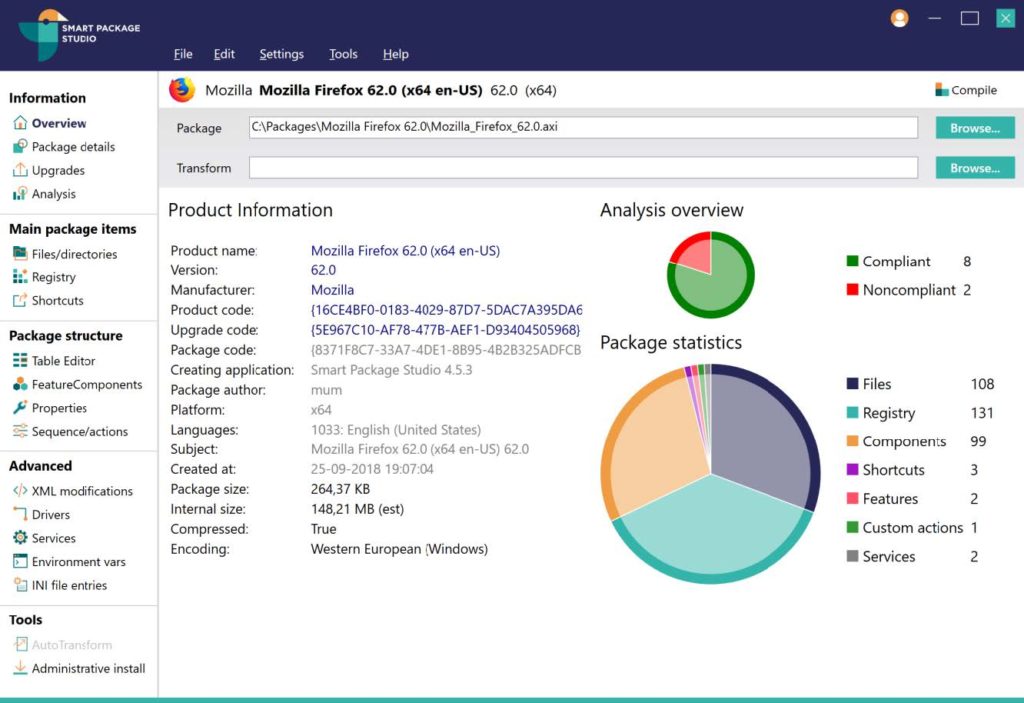
The overview is the first view displayed when loading a package and it displays the following:
- Product Information: Displays the most important properties for the package. Double-clicking
any property will copy the value to the clipboard. - Analysis overview: Displays how compliant the package is with the currently selected analysis
template. Double-clicking Compliant or Noncompliant will show the Analysis
view. - Package statistics: Displays an overview over the items contained in the package.
Double-clicking on any entry type will show the appropriate view. (Files, Registry,b>
etc.).
The Browse buttons may be used to open another package, or to apply a transform to the current
package.
4.2. Package details
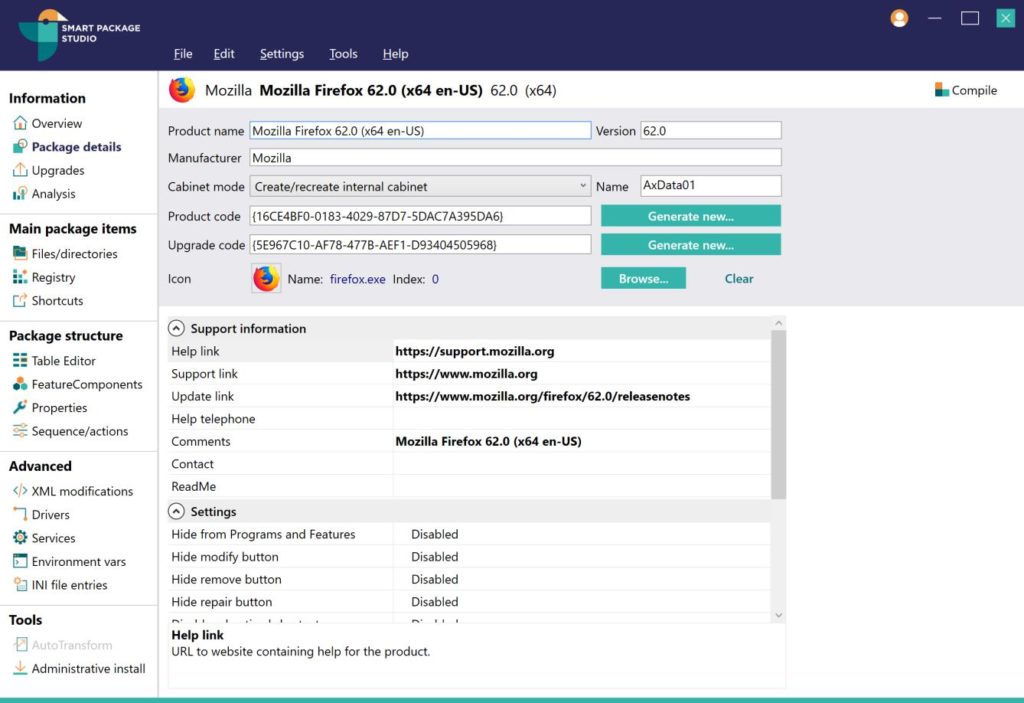
The Package details view displays and allows editing of the main information for the package. This
includes a range of properties related to how the package is displayed in Programs and Features, the product
and upgrade codes, some SummaryInformation properties, and how cabinets should be handled if the current
package is a project.
Note: The product code and upgrade code properties are important. The product code uniquely identifies
the package, and care should be taken when this is changed. The upgrade code determines how upgrades are
handled and the same precautions should be taken for this. For more information see MSDN: https://docs.microsoft.com/en-us/windows/desktop/msi/product-codes
4.3. Upgrades
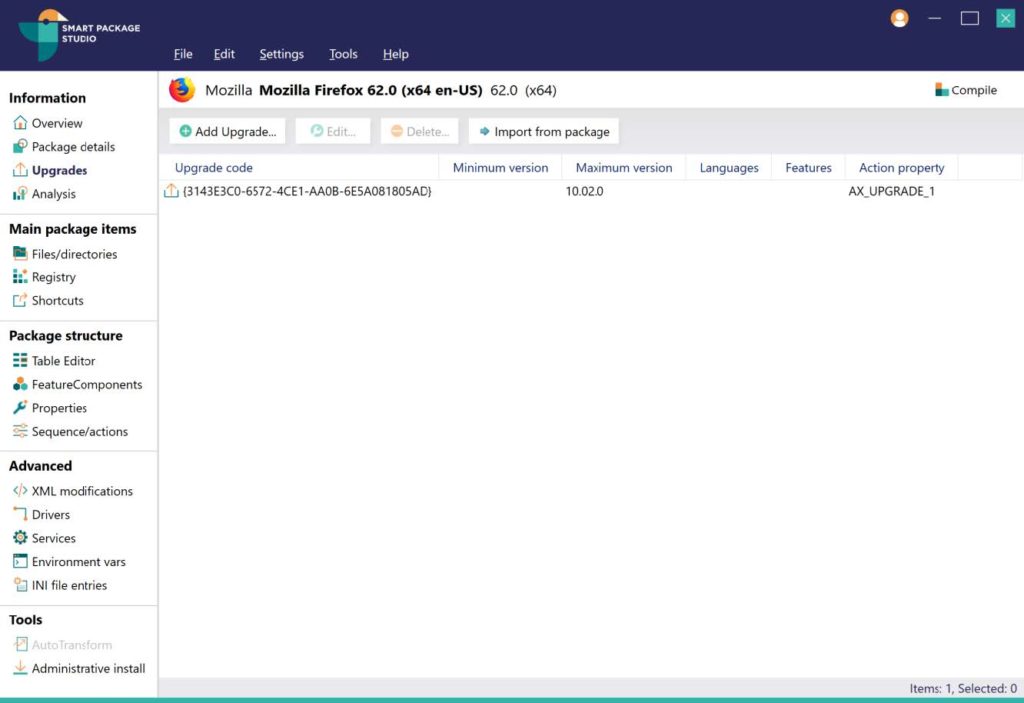
The Upgrades view allows viewing and editing of the upgrade entries contained in the package.
Upgrade entries set a relationship between the current package and other packages that match the upgrade
entry. An entry can be added to detect older versions of the package and upgrade them accordingly.
Add Upgrade manually adds a new Upgrade entry, and Import from package imports another MSI
package that should be upgraded by the currently package.
Note: What an Upgrade entry refers to is not checked beyond that it matches the upgrade code and the
version numbers specified in it, so it is perfectly possible to create a package that upon installation
removes a completely different product.
4.4. Analysis
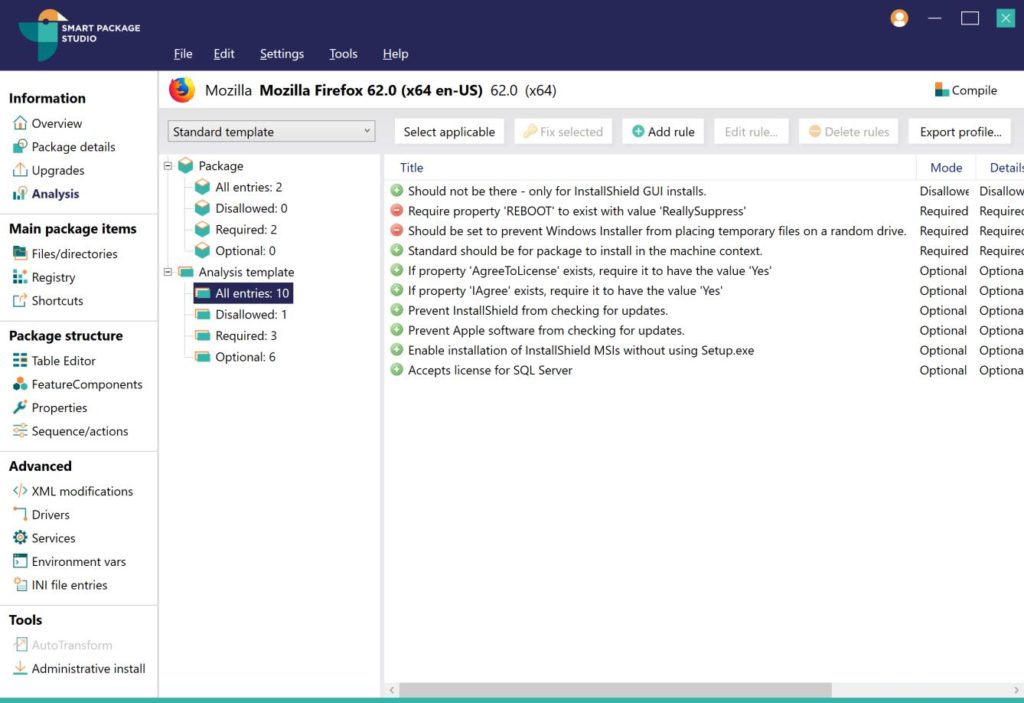
The Analysis view is an important and useful feature of Smart Editor that enables creating and using
analysis templates to set standards for items in packages, see if a given package lives up to these
standards, and automatically fix it when it does not.
The list of templates in the top left enables selecting between the templates stored in the currently
selected file. By default, an internal analysis template file is used. If any changes are made to the
template, it can be saved as an XML file that can be shared and reused.
The tree list of template rule types to the left can be used to select what types of template rules are
currently visible in the view. Under Package, only analysis rules that the current package does not
live up to are displayed, and under Analysis template all entries are shown including those that the
package does live up to.
In the list of analysis rules the rules for the current view are displayed.
The Select applicable and Fix selected buttons can be used to quickly ensure the current
package is fixed to adhere to the rules in the current analysis template.
4.5. Files/directories
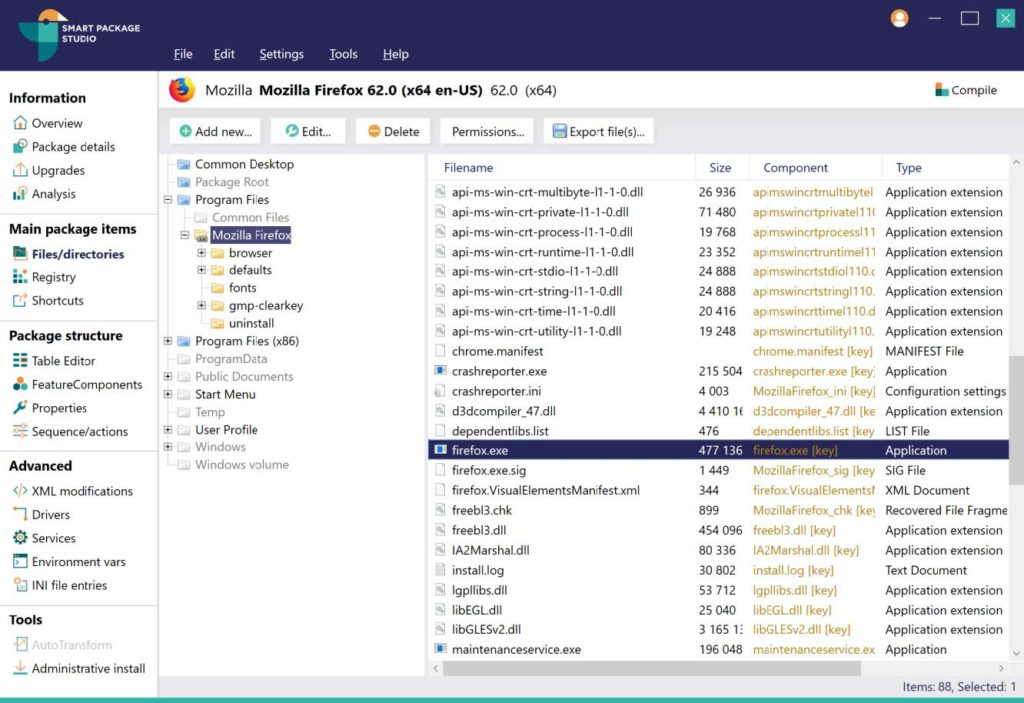
The Files/directories view shows all entries that are related to the file system for the package.
This includes:
- Files
- Shortcuts
- RemoveFile entries: These are used to remove files or folders, either upon installation of
the package or upon removal of the package. - INI files: INI files can be stored in the IniFile table rather than as a file. This enables
using MSI properties in the values and editing single entries directly instead of modifying the
source file. Smart Capture will by default store INI files in the IniFile table if it is possible.
Files can be dropped from Windows Explorer into the window to add them to the package, and also dragged from
the window back to Windows Explorer in order to extract them from the package.
The state of items are displayed as follows:

- Green: Item was added to the package.
- Blue: Item has been modified.
- Red: Item is deleted.
The Directories view shows a tree of the directory structure of the package. Directories are marked as
follows:
- Blue – Predefined directories: Directories that are predefined by the MSI format and
represent specific areas on the target PC, such as the Desktop, Program Files, etc. - White – Missing predefined directories: Predefined directories that do not exist in the
current package. Right-click one of these and select Add this directory to the package in
order to add it. - Yellow – Custom directories: Directories that are not standard and are defined by the
package.
To add a new directory, Click Add new -> Directory or right-click an existing directory and select
Add directory.
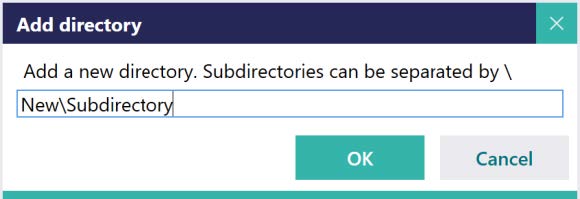
The Add directory dialog enables adding a new directory, or multiple layers of directories if
separated by backslashes.
Note: The directory structure can vary significantly between packages; there are several ways to achieve
the same directory structure when the package is installed. The directory structure in vendor packages
may not always be immediately apparent as properties or custom actions may be used to change the
destination path of a directory in the package.
The context menu for directories has the following options:
- Show in table: Shows the directory row in the Table Editor view in the Directory
table. - Expand subdirectories: Expands all subdirectories of the directory.
- Hide/show empty directories: Hides or shows empty directories in the tree.
- Add directory: Adds a new directory.
- Delete: Deletes the directory, including all items contained within.
- Restore: Restores the directory if it has been deleted.
- Refresh: Refreshes the entire directory tree.
- Permissions: Opens a dialog to set permissions for the directory.
- Set as INSTALLDIR: Sets the directory to be the primary installation directory of the
package. - Enable self-repair: Checks the directory to see if it is within the user profile, and if so,
creates registry values in HKEY_CURRENT_USER for each component that reference the directory and
sets those values as key paths for the components. This ensures that any files in these directories
are correctly copied into the user profile when an advertised shortcut is activated. - Export files in directory: Opens a dialog to export the directory from the package with all
files and subfolders.
4.5.1. Adding files
It is possible to add files in the following ways:
- Select Add new -> Files to select a range of files to be added to the package.
- Select Add new -> Files from folder to add an entire directory to the package, complete
with subdirectories and files within. - Drag any number of files and/or directories from Windows Explorer into the Files view.
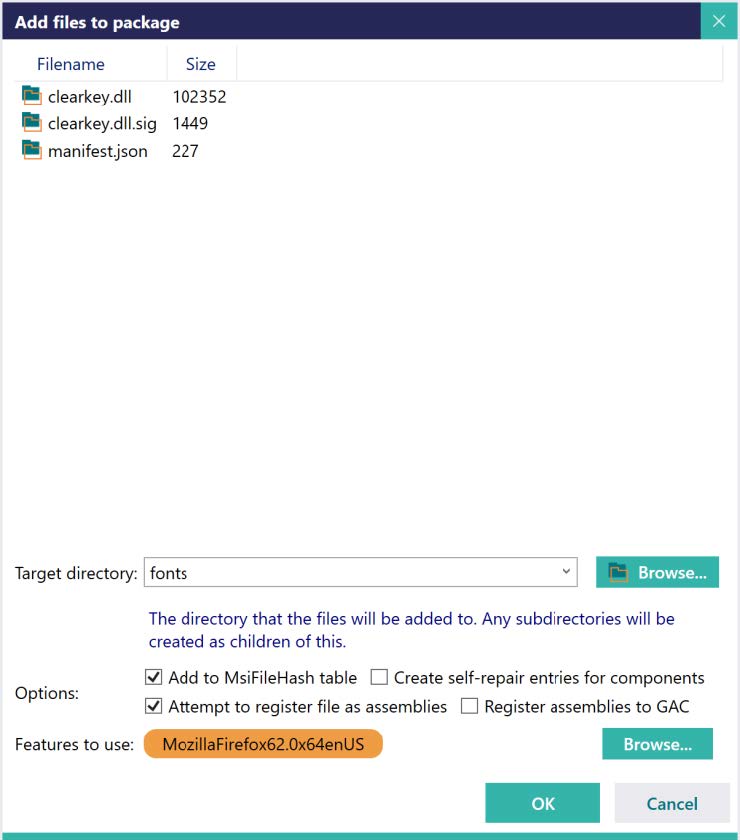
The Add files to package dialog is shown when any of the above methods are used and sets properties
related to how the files should be added.
Components are automatically created as needed for the new files:
- Target directory: Change the directory the files/directories should be added to.
- Add to MsiFileHash table: If the new files should be added to the MsiFileHash table.
- Create self-repair entries for components:If enabled, registry keys in HKEY_CURRENT_USER are
automatically created and set as key paths for components created for the new files. This option is
automatically enabled when adding files to a directory that is in the user profile and does not
normally need to be changed. - Attempt to register file as assemblies: Check if any of the added files are .NET assemblies
and register them into the MsiAssembly table if they are. - Register assemblies to GAC: Registers any detected .NET assemblies to the Global Assembly
Cache. - Features to use: Select what features the new files should be added into.
4.6. Registry
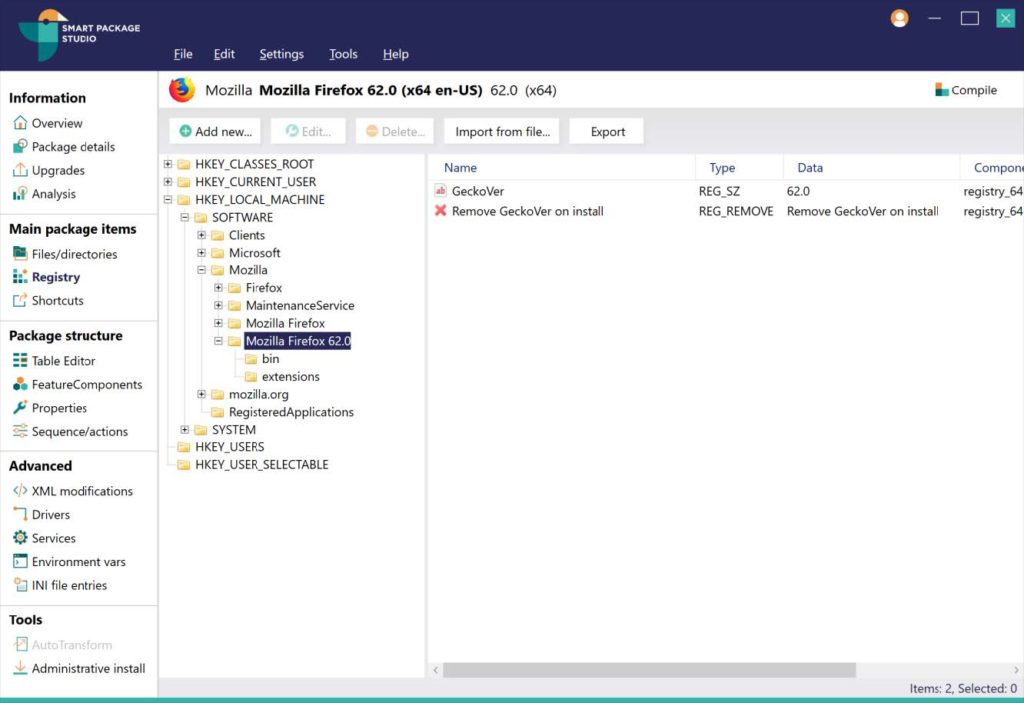
The Registry view enables editing the registry keys and values in the package.
Windows RegEdit style .REG files can be imported and exported by using the Import from file and
Export buttons.
The view shows both entries from the Registry and the RemoveRegistry tables. RemoveRegistry
entries are used to remove registry values or keys when a package is installed.
4.7. Shortcuts
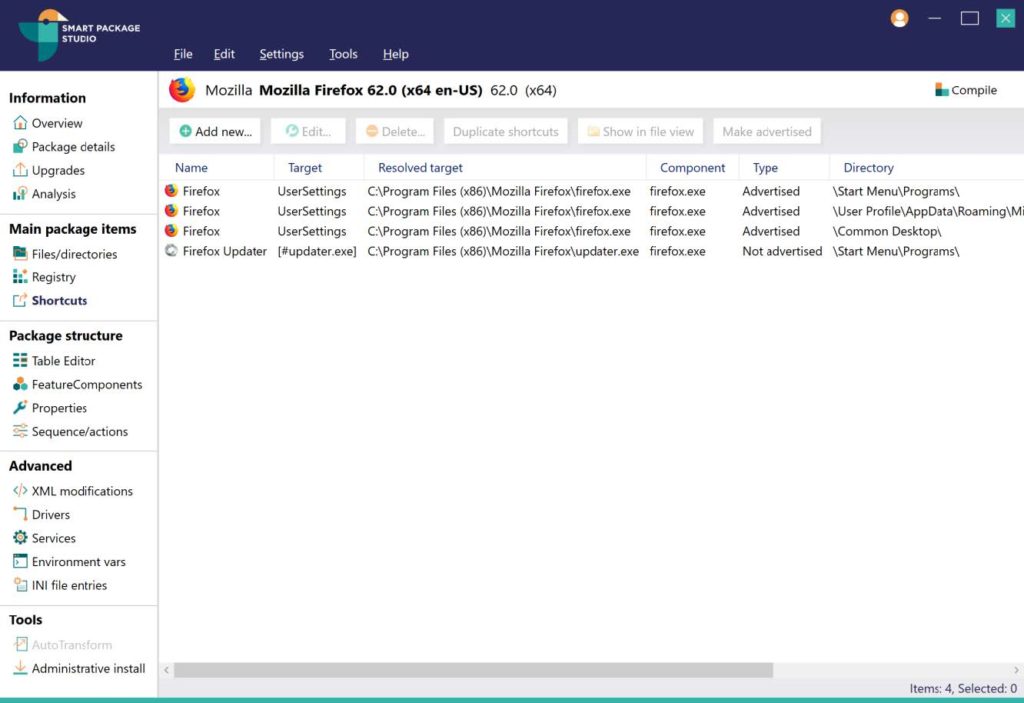
The Shortcuts view enables editing the shortcuts contained in the package.
Note: Advertised shortcuts are distinguished by not pointing to a specific path, but by pointing to the
key path of a component in a specific feature. This enables Windows Installer to initiate a self-repair
of the package if any components are not detected as installed when the shortcut is activated. This is
commonly used to ensure registry values or files in the user profile are copied when the application is
started the first time after an installation. It is recommended to always use advertised shortcuts if it
is possible.
The target for both advertised and non-advertised shortcuts is resolved, making it easy to see the target
file of a shortcut.
The Shortcuts view contains the following notable functions:
- Duplicate shortcuts: Creates copies of the selected shortcuts in another specified directory
- Show in file view: Shows the target of the shortcut in the File view
- Make advertised: Attempts to make a non-advertised shortcut advertised. It is only possible
to make a shortcut advertised if the target of the shortcut is contained in the package and can be
properly resolved by Smart Editor.
4.8. Table Editor
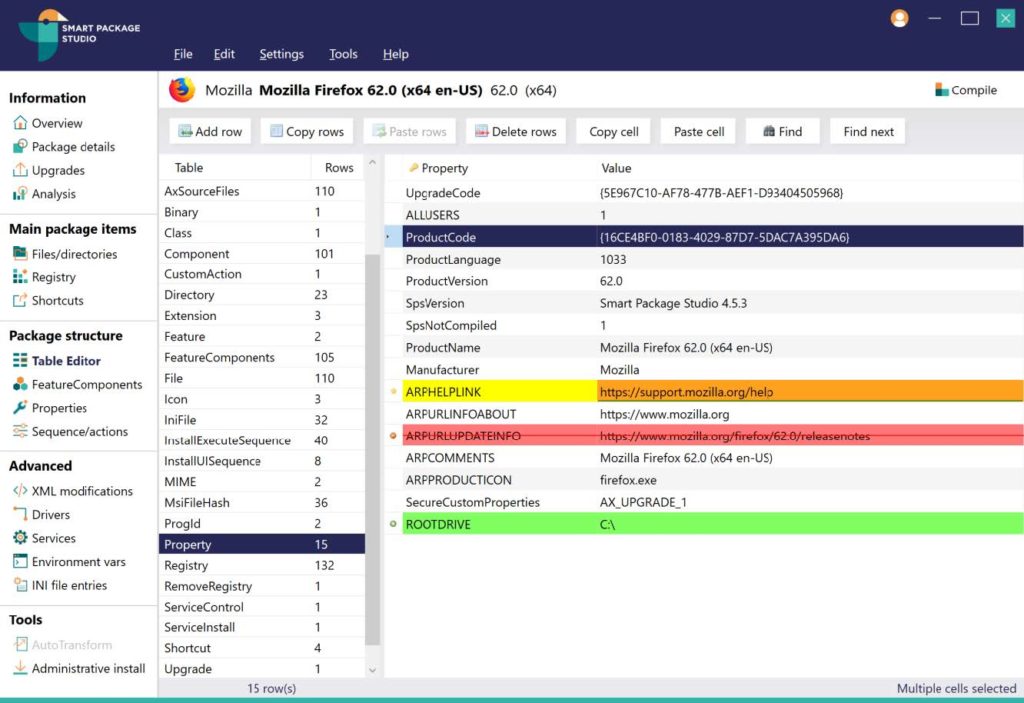
The Table Editor view provides direct editing of all tables in the package. While it is a useful and
powerful tool, it is important to keep in mind that many changes may break functionality of the package and
care should be taken when editing directly.
Rows and cells can be copied and pasted, and modified/deleted/added rows and cells are marked as follows:
- Modified cells: Orange
- Modified rows: Yellow
- Deleted rows: Red
- Added rows: Green
The list of tables has the following context menu items:
- Hide empty tables: Changes if empty tables should be displayed or not in the list.
- Add new table: Opens dialog to add a new standard table to the package.
- Delete table: Deletes the table and all rows that it contains.
Additionally Edit -> Go to table provides a handy shortcut to quickly move to the Table
Editor view and display any specified table in the package.
The table editor also contains the Find dialog:
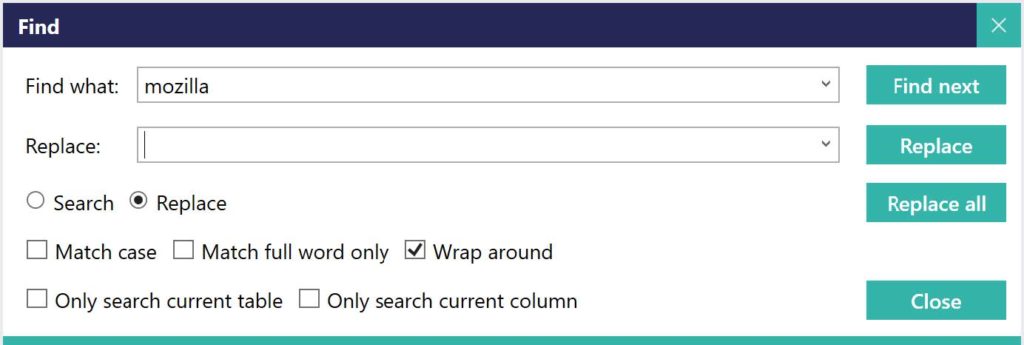
The Find dialog is used to search for and optionally replace values in all tables in the package.
- Match case: Enables case-sensitivity when searching.
- Match full word only: Enables ignoring matches that are contained within a word.
- Wrap around: Start searching from the beginning of the package when the end is reached.
- Only search current table: Only search/replace in rows in the current table.
- Only search current column: Only search/replace in records in the current column of the
current table.
4.9. FeatureComponents
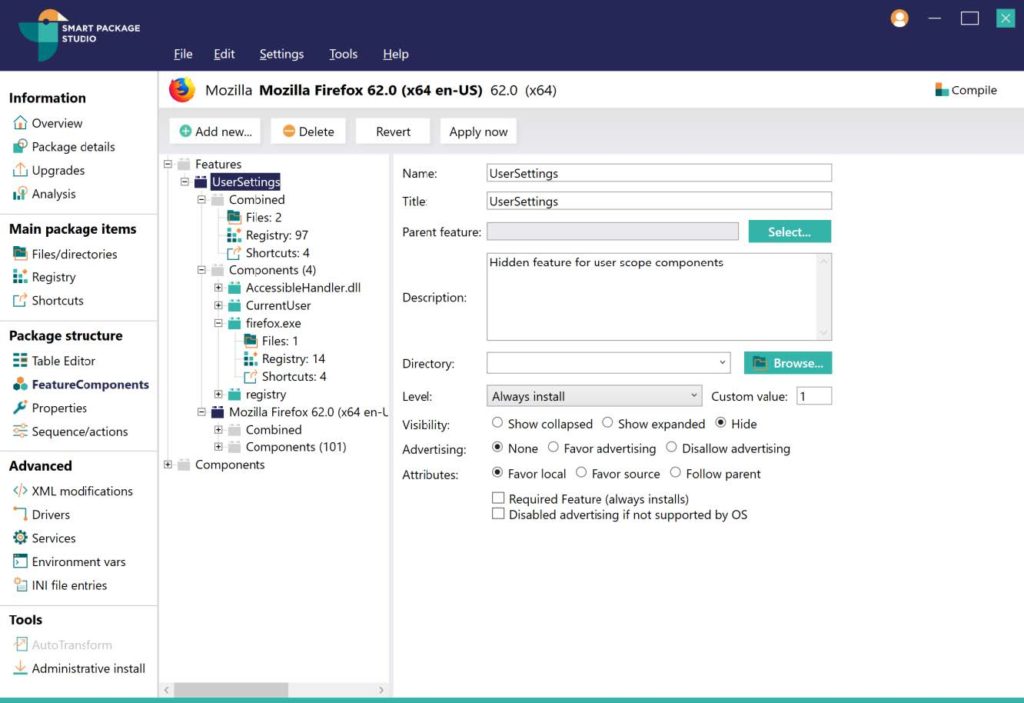
The FeatureComponents view displays a tree of all features and components in the package and their
contents.
The tree contains two root nodes:
- Features: Contains all features in the package in a tree structure with subfeatures displayed
under their parent feature. - Components: Contains all components in the package in a flat list, regardless of what
features they are members of.
Feature nodes contain a Combined node, which contains a list of combined items of all
components within that feature.
Component nodes contain a list of items in the component.
Selecting a node in the tree displays it in the right pane, what is show depends on the type of node
selected:
- Component or Feature: Enables editing the selected item. In this view, the
Revert button discards any changes made to the item, and the Apply now button applies
the changes immediately. Even if the Apply now button is not pressed, changes are saved when
the view is changed. - Combined or component Content node: Displays the items contained in the component or
feature (files, registry values etc.).
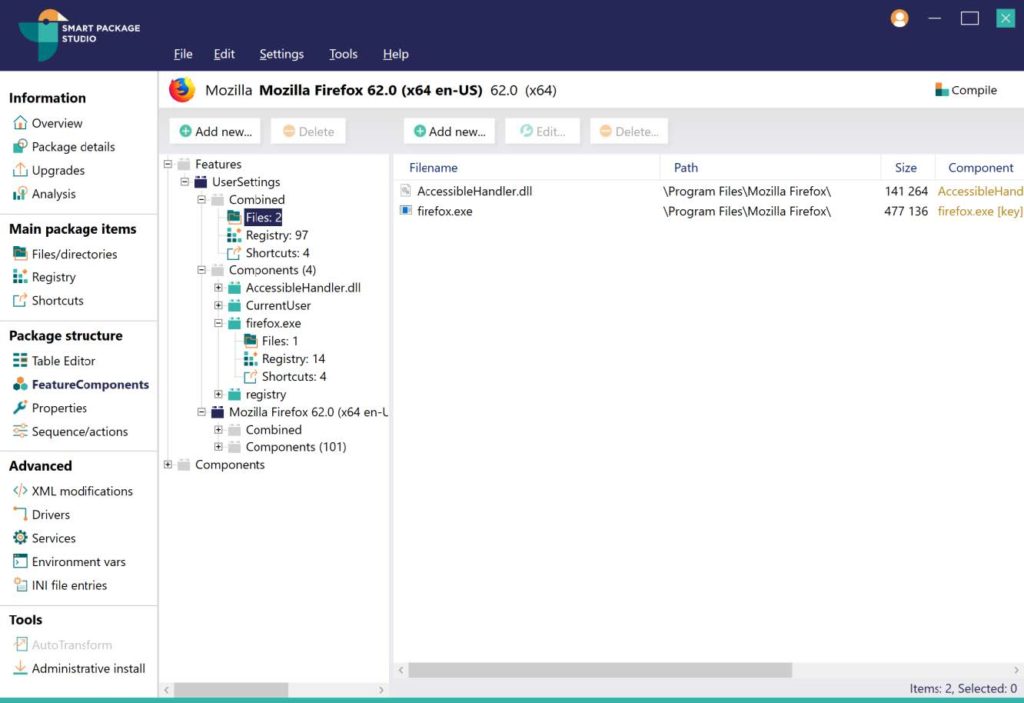
Note: When adding or editing items in the FeatureComponents view, it is possible to cause the item
to be in a different component or feature than the one currently displayed in which case it will not be
visible in the current view.
4.10. Properties
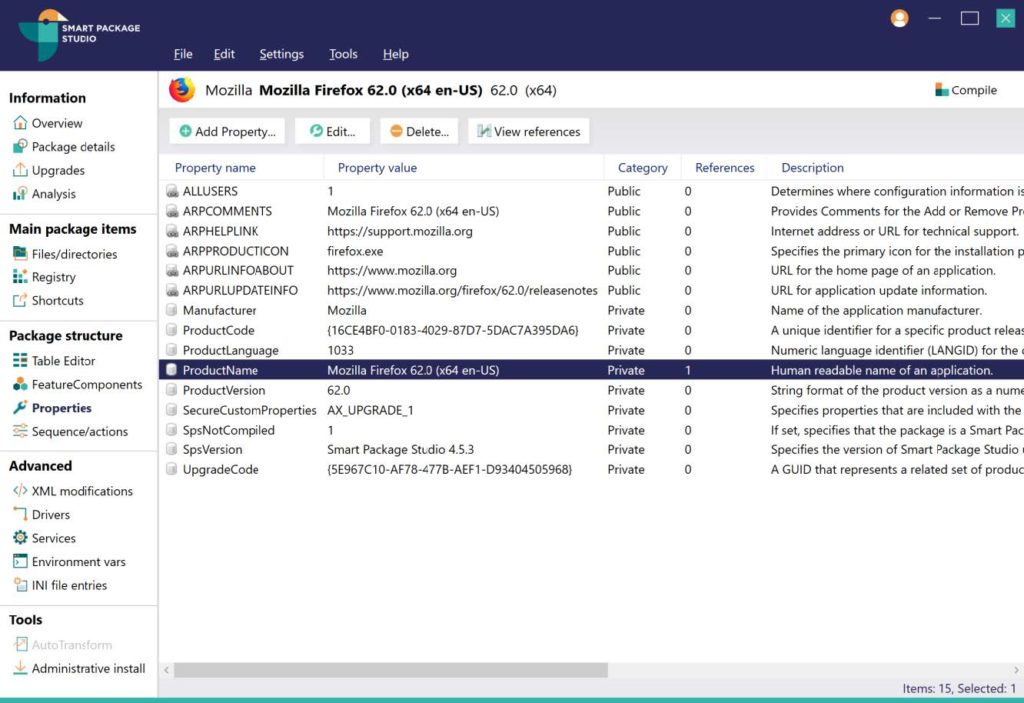
The Properties view enables editing properties in the package.
Properties are a fundamental part of MSI packages and are used in various ways. Many standard properties
exist, even if they are not present in every package, and any number of custom properties are also used. Any
properties known by Smart Package Studio have a description to help explain their purpose.
View references can be used to see all rows in the package that reference a specific property,
providing further information on how it is used.
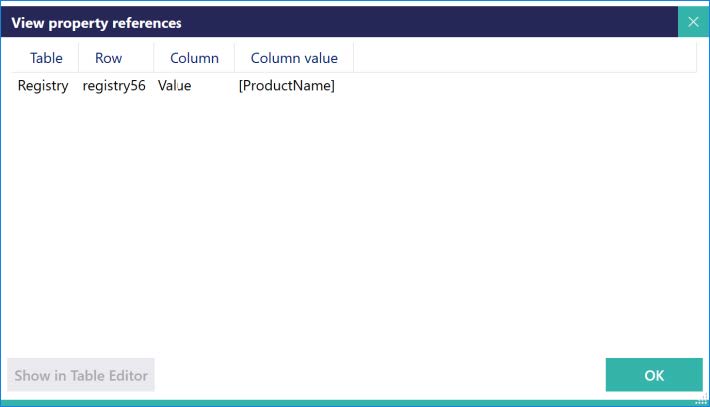
From the View property references dialog it is possible to jump directly to the referenced row in the
Table Editor view.
4.11. Sequence/actions
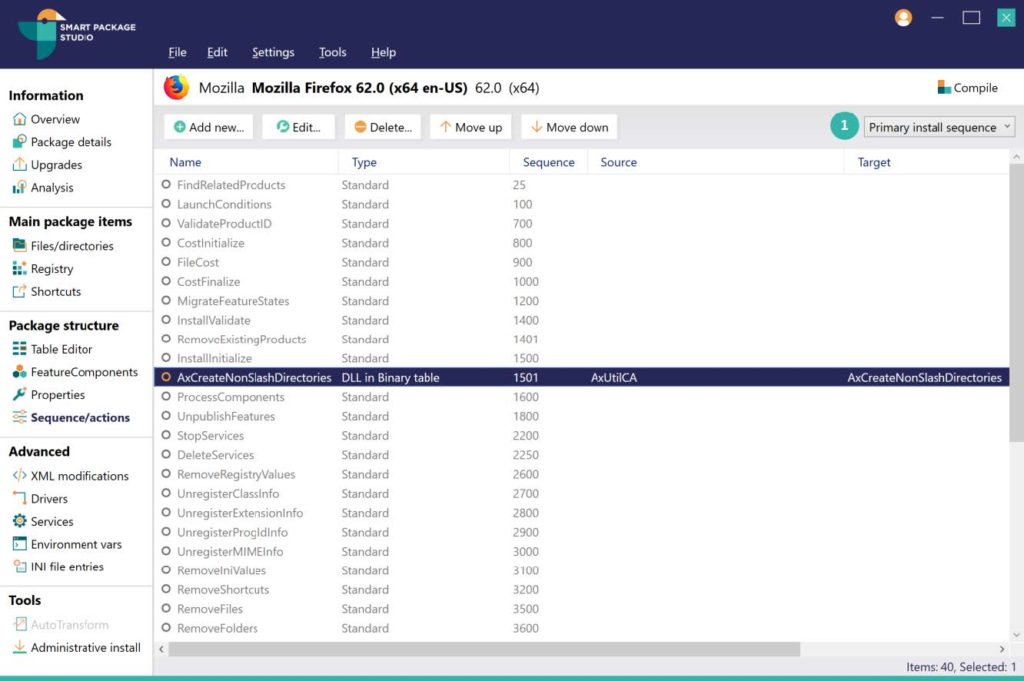
The Sequence/actions view is used for displaying all custom actions in the package, as well as
displaying the various install sequences.
The view can be selected (Point 1 in the screenshot above) between the following modes:
- All custom actions: Displays all custom actions in the package.
- Primary install sequence: Displays the actions that exist in the InstallExecuteSequence table
and will be run during a standard installation. - Primary UI sequence: Displays the actions that exist in the InstallUISequence table and will
be run in addition to those from the primary install sequence during a standard non-silent
installation. - Administrative install sequence: Displays the actions that in the AdminExecuteSequence table
and will be run during an administrative installation. - Administrative UI sequence: Displays the actions that exist in the AdminUISequence table and
will be run in addition to those from the administrative install sequence during an administrative
non-silent installation.
When viewing an installation sequence, both standard and custom actions are displayed:
- Standard action: Actions that are predefined by Windows Installer. These actions have
standardized functionality and cannot be modified although they can be added, moved, and deleted
from a sequence. - Custom action: Actions that are customizable and can take many forms including: running an
executable, a DLL function, VBScript or Jscript stored in various ways, setting properties, etc.
When viewing an installation sequence, the following commands are available:
- Add new -> New custom action: Adds a new custom action to the package and to the current
sequence. - Add new -> Standard action: Adds a standard action that does not already exist in the
current sequence. - Add new -> Existing custom action: Adds an existing custom action from the package to the
current sequence if it does not already exist. - Delete: Removes the action from the current sequence. If the action is a custom action, it is
not deleted from the package, only removed from the sequence. - Show in sequence: If the selected action is present in more than the current sequence,
enables choosing to see it in the other sequences.
4.12. AutoTransform
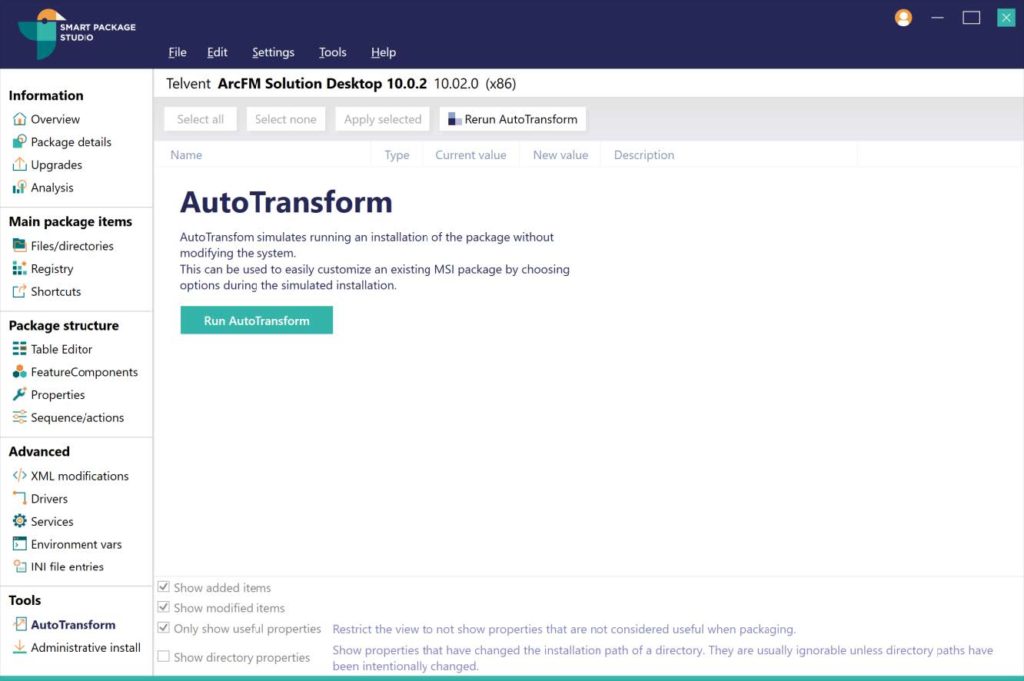
The AutoTransform view enables running a simulated installation of the current package, going through
the same installation process as would happen when installing the package normally, and keeping track of the
changes made. This can be used to easily customize an installation by capturing what changes are performed,
such as enabling or disabling features, entering user or license information etc.
After the simulated installation has finished, the view will present a list of properties, directory
properties, and feature states that have changed and these can be applied to the package.
5. Advanced features
5.1. Drivers
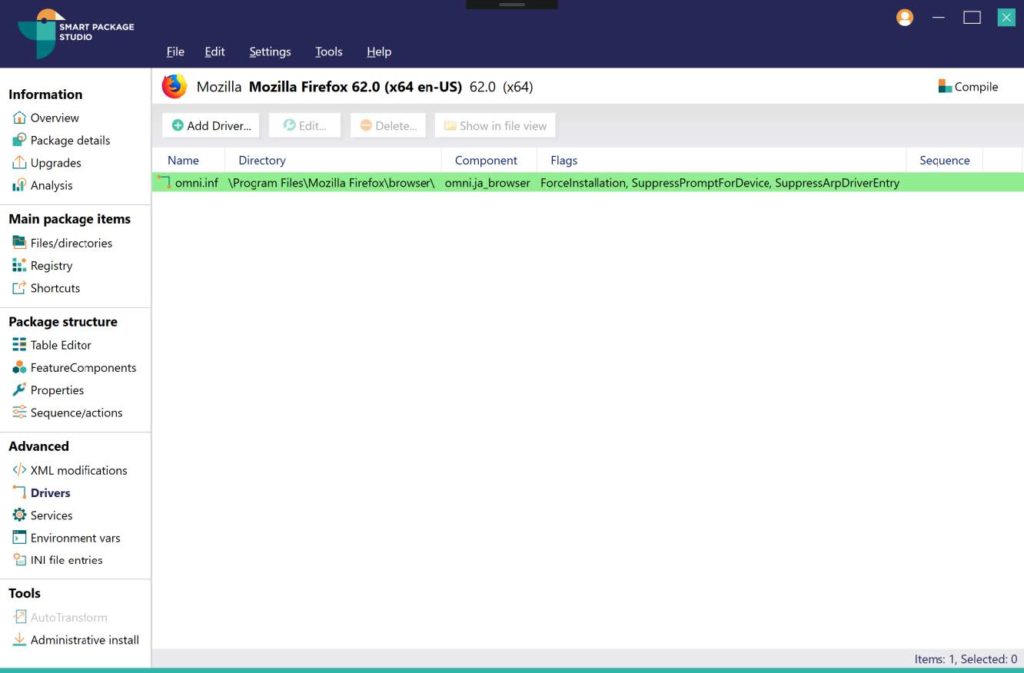
The Drivers view enables installing plug-and-play drivers through the DIFxApp framework.
Drivers are automatically added to packages created by Smart Capture, but drivers can also be manually added
to an existing package.
Clicking Add driver will open a dialog to browse for an .INF setup installation file in the package
to install as a driver.
Note: DIFxApp has a few things to be aware of: firstly, it is exclusively 32- or 64-bit. When saved by
Smart Editor, the 32-bit version of DIFxApp is picked for 32-bit packages and the converse for 64-bit
packages. Though it is technically possible to have a 32-bit package containing a driver that works on
both 32-bit and 64-bit, this is not supported by DIFxApp and two separate packages must be created
instead, or the driver installed in a different way.
Additionally, DIFxApp only supports a single .INF file present in the same directory. To use DIFxApp to
install a driver that contains multiple .INF files, they must be split up into separate directories along
with the files they reference. Smart Capture does this automatically, but it must be performed manually when
adding a driver to an existing package using Smart Editor.
5.2. Services
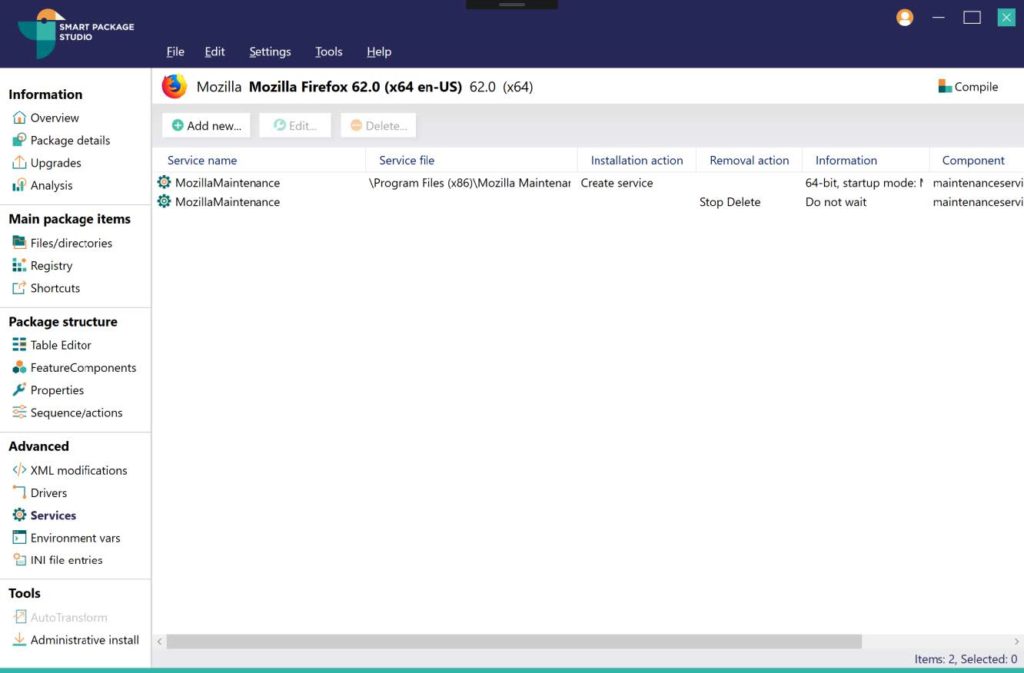
The Services view enables adding new services created by the package, as well as controlling services
already present on the target PC.
- Rows in the ServiceInstall table creates a new service on the target PC when the package is
installed. - Rows in the ServiceControl table controls the state of a service on the target PC, both
during installation and uninstallation. The target service can be stopped, started or deleted.
The default actions performed by Smart Capture when capturing a service is creating a ServiceInstall
row to create the service, and creating a ServiceControl row for stopping and deleting the new
service when uninstalling the package, and starting the service after installing the package. (but only if
the service was running when the capture was created)
5.3. Environment variables
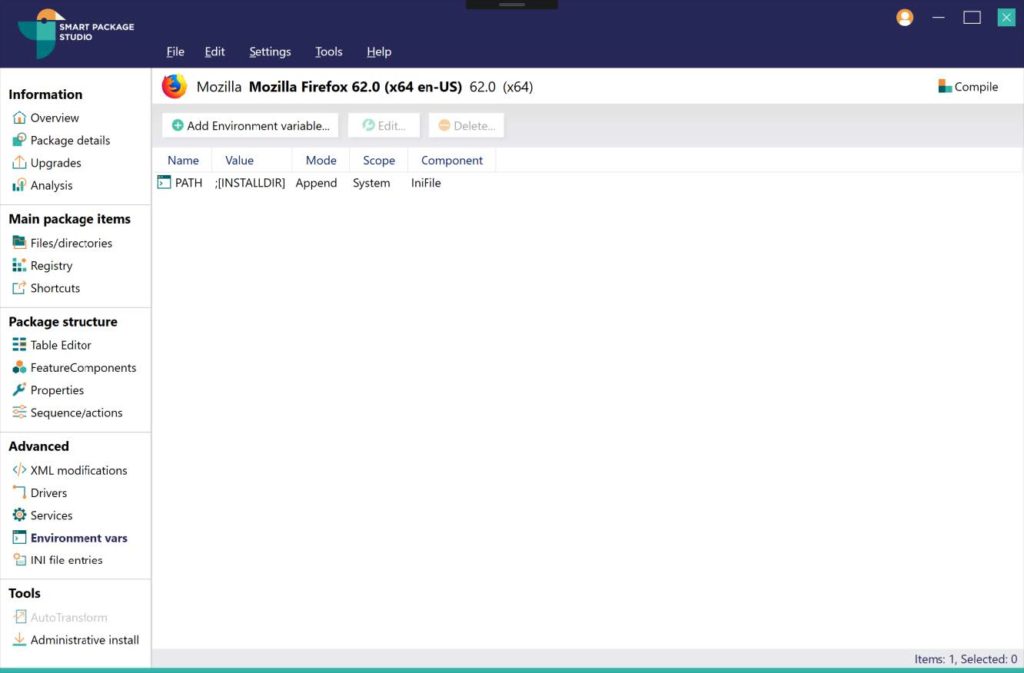
The Environment vars view displays a list of environment variables that are modified by the package.
Variables can replace the existing variable, or append or prepend a value to it.
The most common environment variable to change is PATH. Typically, one or more directories created by the
package are appended to the end of the existing variable.
Note: While it is possible to choose the scope of an environment variable, it is usually desired to only
create system scope variables. User scope variables will only be correctly set if the package supports
and is installed in the user scope, which is not common.
5.4. INI files
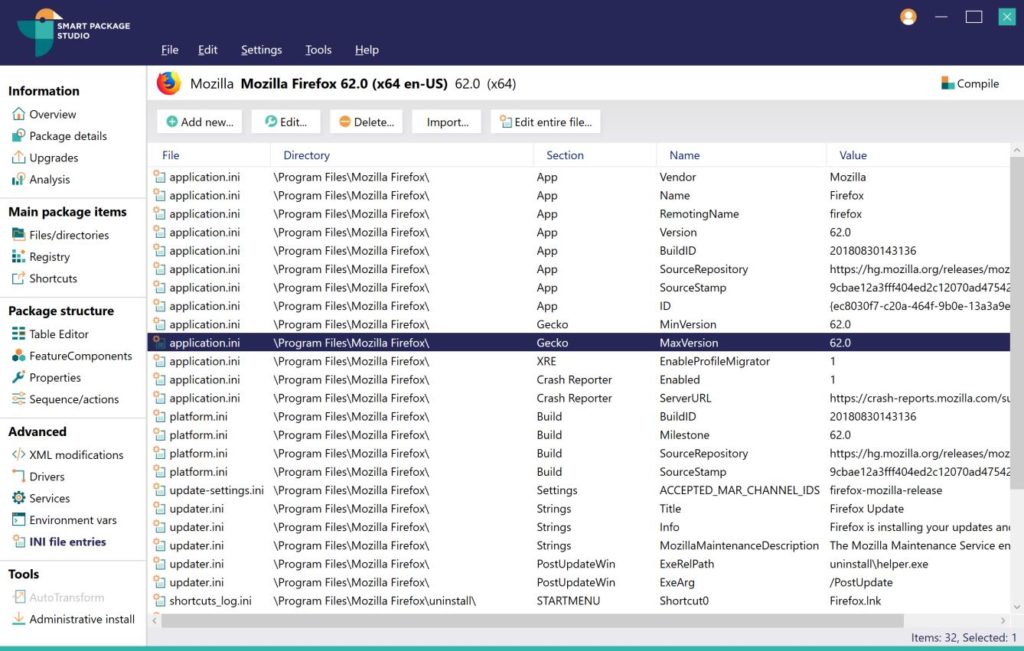
The INI file entries view contains INI entries in the package.
In the IniFile table, each value in an INI file is represented by a single row. This enables setting INI
values that reference a value in the package such as a directory or file. Smart Capture will automatically
parse any valid INI file into this table, depending on how it is configured.
Each entry can be edited individually, but it is also possible to edit all INI entries that represent the
same file once the package has been installed at the same time by using the Edit entire file button.
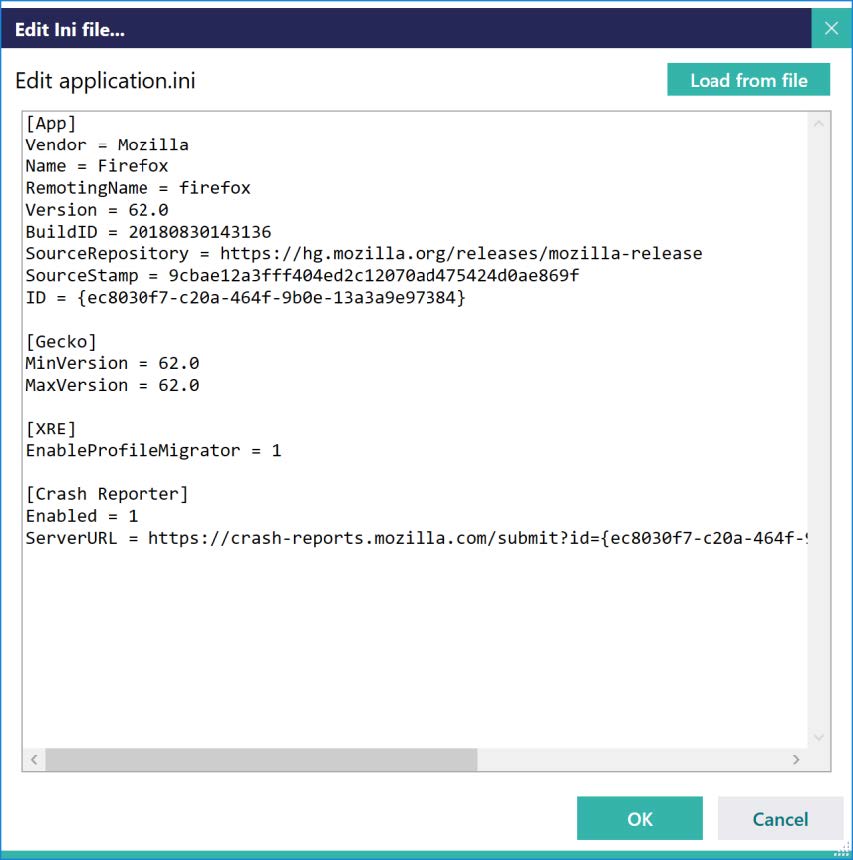
This presents a view as would be seen when editing the generated INI file after an installation in a text
editor, and enables quickly removing or adding a range of entries – as well as importing from an existing
INI file.
5.5.Administrative installation creator
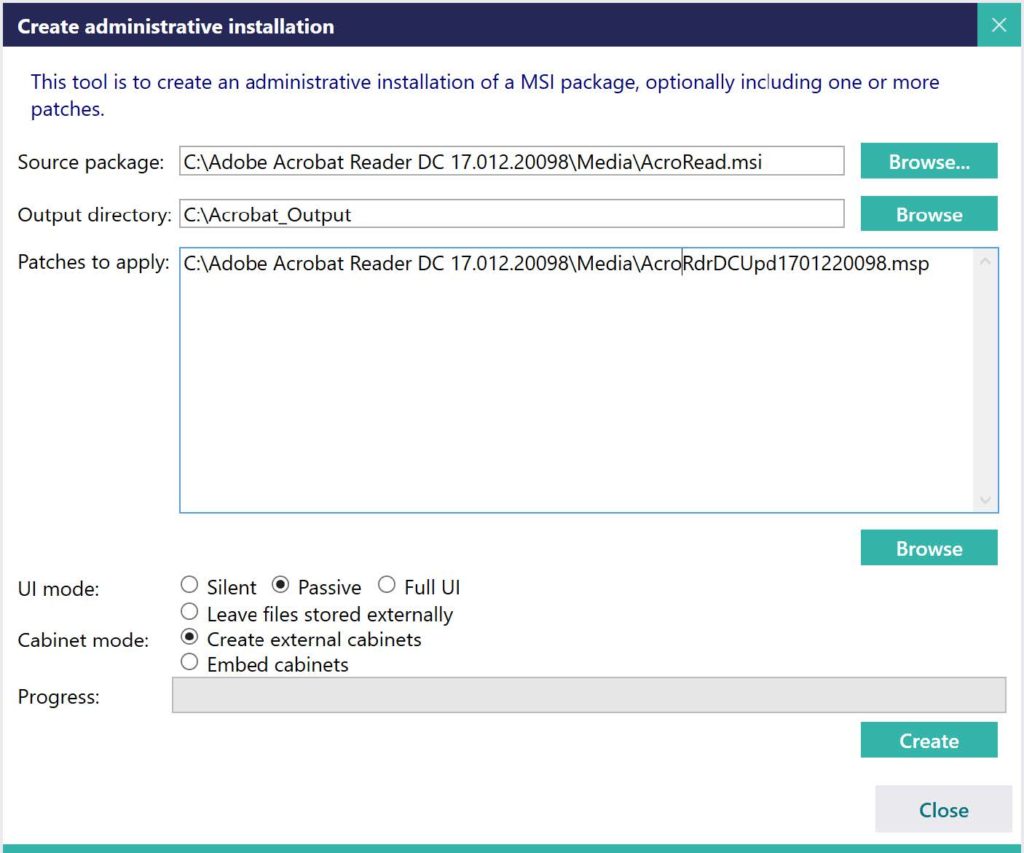
The Create administrative installation dialog is used to create an administrative installation of a
package and supports applying any number of patches and compressing the resulting installation.
This dialog is useful when you have an MSI package that has multiple or large patches that need to be
applied. Instead of applying the patches after installing the package, which takes up more space and longer
to install, an administrative MSI package containing the patches can be generated and compressed.
The following options are configurable:
- UI mode: Specifies what UI mode to use for creating the administrative image
- Cabinet mode: Specifies how the files of the administrative package should be compressed
6. Integrating with Smart Tester
Smart Editor supports integrating with Smart Tester in order to easily test packages.
In the Tools menu, there are two items for opening the current package in Smart Tester:
- Open in Smart Tester: Opens the current package in Smart Tester. If the current package is a
project and has not been compiled, it will be compiled before being opened. - Open in Smart Tester (including changes): If any changes have been made to the current
package, these are saved to a temporary package which is then opened in Smart Tester. This enables
testing changes made in Smart Editor before saving them.