Smart Tester Manual
1. Description
Smart Tester is a program for testing Windows Installer packages, executables, and scripts within a virtual
machine.
The purpose of the program is to enable testing to determine if installations are working correctly across
different environments, without compromising the state and configuration of the host PC.
1.1 Features
- Test Windows Installer packages App-V packages, executables, WSH script files and batch scripts.
- Open a folder from the host in a virtual machine (VM) using a virtual network drive, or by copying
its contents. - Run installations silently with the VM running in the background, or run them with a normal GUI so
they can be interacted with. - Add and select from any number of Snapshots for any number of supported virtual machines.
- For Windows Installer packages, supports configuring the installation commands and retrieving
installation log files from the virtual machine. - Make the package available to the virtual machine in different ways: through a Virtual Network
Folder or by copying the files into the virtual machine. - Create a list of commonly used commands for the virtual machines and access them easily through the
Manual Control list. - Browse and export files and registry values from the virtual machine.
- Keep a list of prerequisite programs that can be installed automatically before running a test of a
package. - View applications installed in a VM, and remove/repair them complete with log handling.
- Run test and set settings using command line parameters.
2. Installation
2.1. Prerequisites
Smart Package Tester requires the following applications installed on the target PC:
- Microsoft .NET Framework 4.6.2
- Oracle VirtualBox 5.2. or newer.
2.2. Installation
Run the installation MSI for the appropriate version of your operating system (x86 or x64).
3. Configuration
3.1. Initial setup
This is the main window of the application:
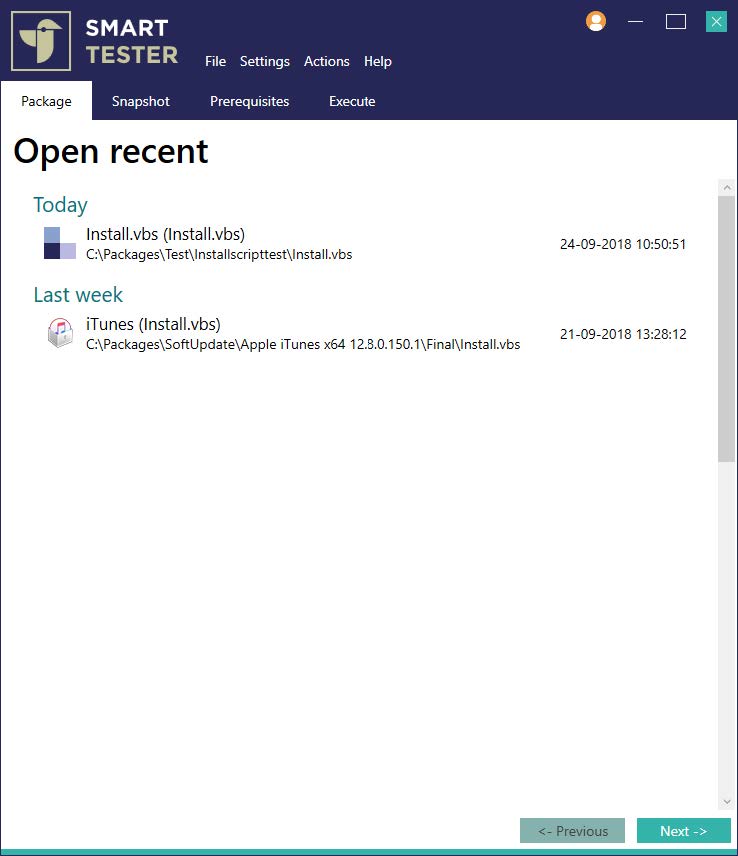
There are four steps to a testing procedure:
- Selecting the package to test and the options to use.
- Selecting the virtual machine snapshot to use.
- Selecting any prerequisites to be installed before the test.
- Running the test.
Package view:
If no package is open displays a list of recently opened packages, or displays information and configuration
options for the currently loaded package.
Snapshot view:
Contains the virtual machine snapshots that have been added to the program and can be used for running
tests.
Prerequisites view:
Contains the prerequisite packages that have been added to the program and can be run as part of a test
installation.
Execute view:
Control the state of the selected virtual machine, run installation and uninstallation of the selected
package, view progress and log file output, and access various other tasks pertaining to the virtual
machine.
3.2. Adding snaphots
Initially one or more virtual machine snapshots must be added to use for testing. Select Configuration
-> Add snapshot from the menu:
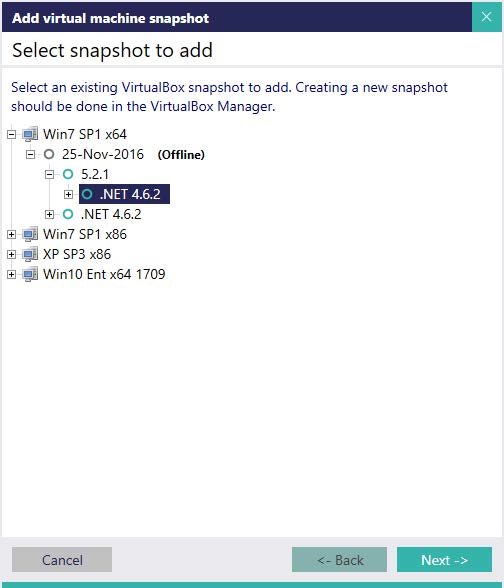
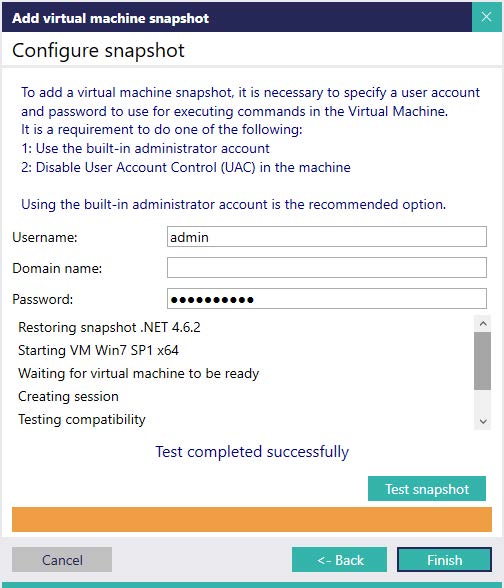
Figure 1 – Select snapshot to add: Displays a tree of all VirtualBox virtual machines and their
snapshots.
Select which snapshot to add and press Next.
Figure 2 – Configure snapshot: Enter the login information to be used for the snapshot.
After entering the information, Test snapshot runs a range of tests to ensure that the selected
snapshot is configured correctly for use with the program.
Press Finish to close the dialog and add the snapshot to the program.
3.3. Setting package options
Some options apply to all types of packages, and some only apply to certain types. Only the options relating
to the currently loaded package will be displayed.
Settings changed in the main window do not persist between sessions –the default options when opening the
program can be set in the settings dialog under Settings -> Preferences.
The following options are always available:
- Arguments: Any additional arguments for the package. For executables, they are given as
arguments to the executable. For Windows Installer Packages they are appended to the arguments given
to MsiExec. For WSH scripts they are appended to the arguments given to the WSH script host. - Execute under the Local System account: Executes the specified package under the Local System
account rather than the account that was specified for the snapshot. Note that this can cause issues
with some packages because the GUI for the installer may not appear, or appear inside an Interactive
Services Detection window on versions of Windows newer than Windows XP. - Allow interaction with desktop: By default, installations that are run using the Local System
account are not visible to the user logged on to the virtual machine. Enabling this option makes
this visible.
The following options are only available for WSH script packages:
- Script host: Which Windows Script Host to use for the execution of the selected script.
- Run passive: If set, suppresses all error messages and script output from the selected script
to enable it to run silently.
The following options are only available for Windows Installer packages:
- Transform: Which transform, if any, to apply to the loaded package.
- Display mode: How the GUI should be displayed for MsiExec.
- Log mode: Specifies what should be logged from the installation. The log files created during
Windows Installer package testing are copied from the virtual machine and can be read on the host. - Install mode: If the selected package should be installed, uninstalled or both during the
test.
3.4. Selecting the package availability mode
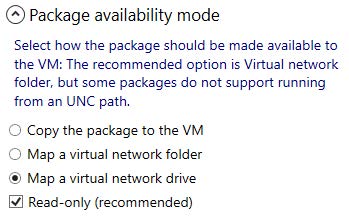
The package availability mode determines how the package content should be made available to the selected
VM.
- Copy the package to the VM file: Copies the folder, including subfolders, in which the
selected package is located to the VM. Select this option if the package needs to be able to change
any of the installation files, but be aware that this can take a while for large packages. - Map a virtual network folder: This is the preferred method. A virtual network folder is
mapped to the path where the selected package is located, and the package executed from there. - Map a virtual network drive: Same as above, but also maps a network drive to the virtual
folder. This is necessary for some packages that cannot run from a UNC path. - Read-only: Enabling this makes the network drive or folder read-only for the VM. It is not
advised to disable it as a bad package may otherwise corrupt or infect files in its containing path.
3.5. Editing Manual control tasks
To edit the available tasks, select Settings -> Edit manual control tasks… from the menu.
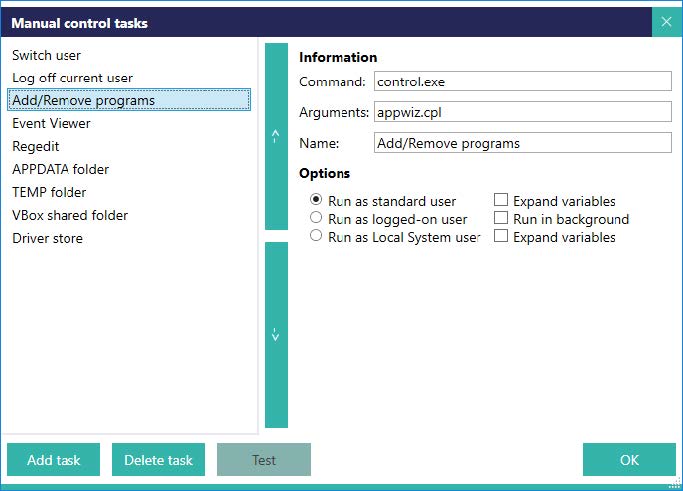
The dialog displays a list of tasks on the left and enables configuring them on the field on the right.
The following options can be set for the tasks:
- Command: The program to execute in the VM. A file name must be specified, and usually the
full path must be specified. The only exception to this is when the target program is stored in the
System Folder (default: C:\windows\system32) in which case only the filename is necessary. - Arguments: Arguments given to the executable. Currently does not expand environment
variables, so paths must be explicitly specified. - Name: The displayed name of the task.
- Run as standard user: Runs the task as the user specified for the snapshot. Note that this
may not necessarily be the same user as is currently logged on to the virtual machine. - Run as logged-on user: Runs the task as the user currently logged on the virtual machine.
- Run in system context: Runs the task using the Local System account.
- Expand variables: If environment variables should be expanded in the arguments.
- Load user profile: If the user profile used to authenticate in the VM should be loaded for
running the task. In most cases this doesn’t make a difference, but it depends on the command that
is being run. Not loading the profile speeds up starting the task. - Run in background: If the task should run in the background with no window displayed.
- The buttons with the green Up and Down arrows are used to change the order of the
tasks. If the currently selected VM is running, the Test button can be used to test the
selected task.
3.6. Editing Prerequisite packages
The Prerequisites view contains a list of packages that can be easily installed in the selected
virtual machine.
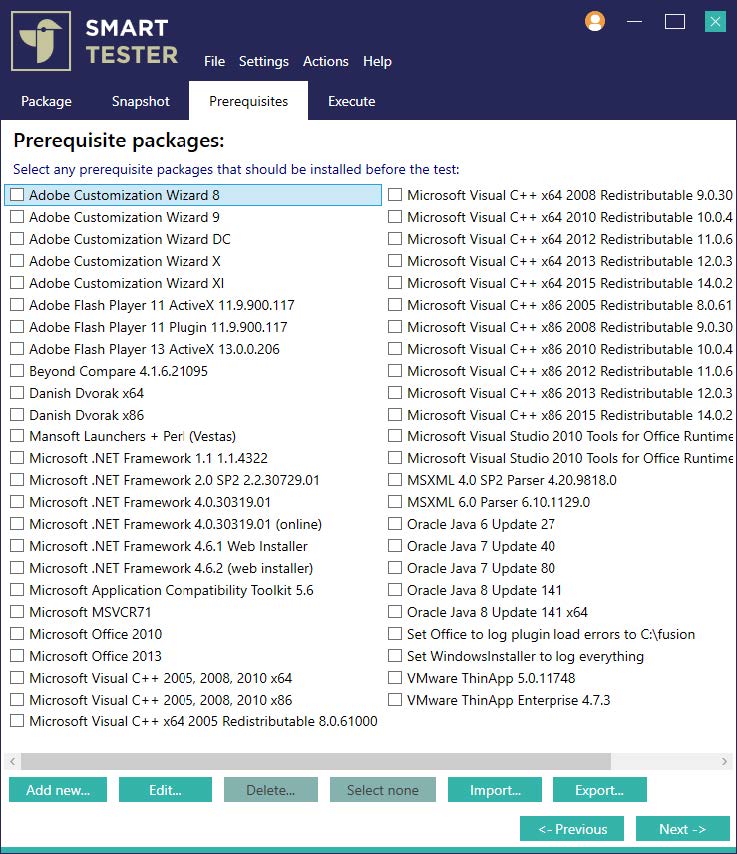
The tab has the following options:
- Add new: Opens a dialog to add a prerequisite package.
- Edit: Opens the edit dialog for the selected package.
- Delete package: Removes the package from Smart Tester.
- Select none: Clear the checkboxes from any selected packages.
- Import: Prerequisite packages can be imported and exported. The function opens a dialog where
you can select a folder that contains previously exported prerequisite packages that contain import
XML files. - Export: Creates import XML files in the directories of all prerequisite packages that have
been added to the program. The folder containing the packages can then be copied to other computers
and imported.
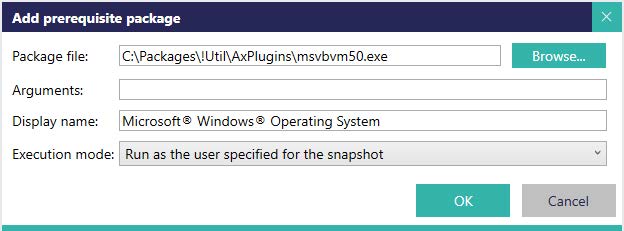
The dialog for adding prerequisite packages has the following options:
- Package file: The package that should be installed.
- Transform: Transform file for the package (only applicable if the package is a Windows
Installer package). - Arguments: Arguments to the executable/script/package during installation.
- Name: Name of the package as displayed in the menu.
- Execution mode: What user to use for installing the package.
4. Usage
4.1. Opening packages
Packages can be opened from within the program, but Smart Tester also adds itself to the right-click menu
for the following filetypes when installed:
- Windows Installer packages (.MSI): When opening Windows Installer packages, the program checks if a
Transform file (MST) exists with the same name as the package and loads it if it exists. - Visual Basic Scripts (.VBS)
- Javascript files (.JS)
- Executables (.EXE)
- Batch files (.CMD / .BAT)
- PowerShell scripts (.PS1)
- Supported XML package file formats (SoftwareCentral.XML)
- Folders
To open any of these, right-click a file in the Explorer and select Open in Smart Tester.
To open a package from within the program, select File -> Open package from the menu or click the
Browse button on the Select package tab.
A list of recently opened packages can be found in the menu under File -> Open Recent.
Additionally, an extra menu exists for directly starting a test by selecting the Open in Smart Tester
(snapshot) option and selecting a snapshot.
4.2. Selecting Snapshots for test
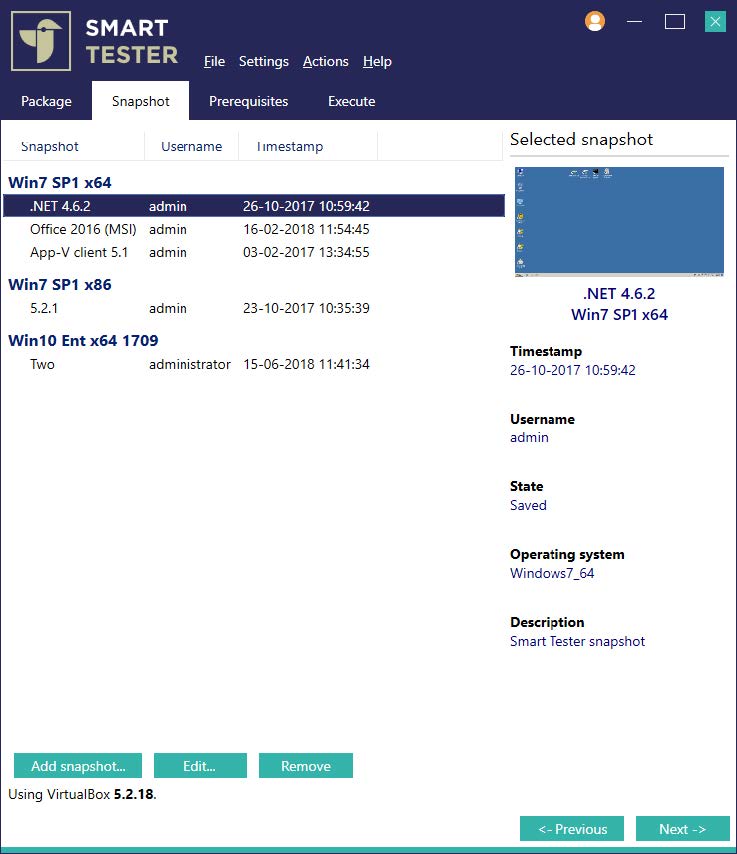
The Snapshot view is where which snapshot to use for testing is selected. Snapshots can also be
added, edited or removed.
4.3. Running the test
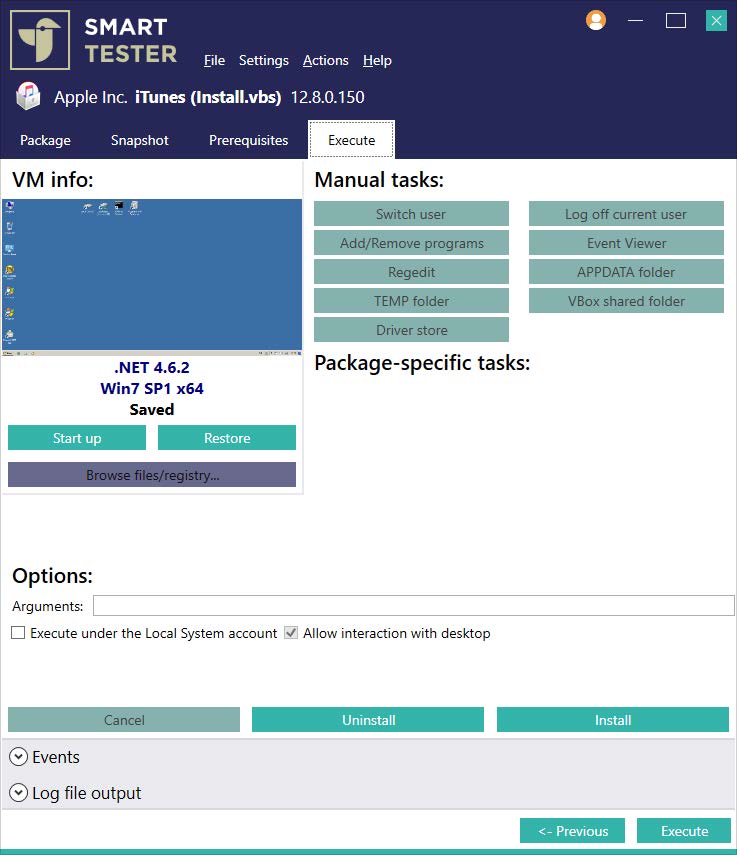
The Execute view is used for running the test. The Execute/Install button is used to start the
test procedure, and the Uninstall button is enabled for packages that support uninstallation.
The Options for the package can also be specified here, for easier access when testing multiple
times.
Progress of the current test is displayed above the test buttons:
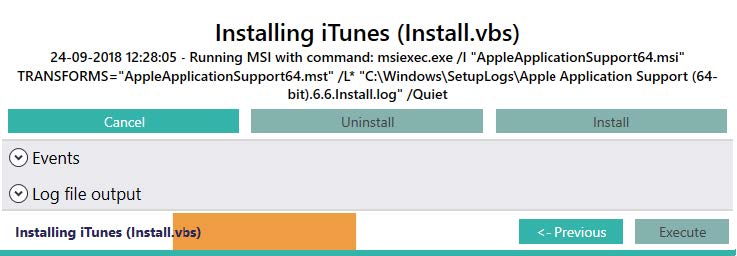
The Events drop down menu displays the steps that the installation is going through.

The Log file output drop down menu displays the log file output for the current test. Note that not
every type of package supports log file output, so for some types of packages this field will be blank.
4.4. Viewing the current state of the VM
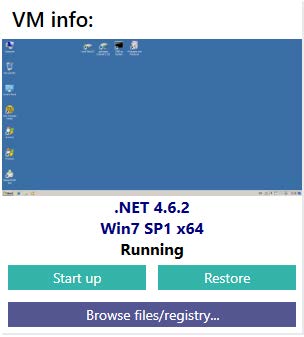
The Start up and Restore buttons are used to start the virtual machine and restore it to the
selected snapshot again. This is useful if you wish to manually make a modification in the virtual machine
before starting the test, and to shut down the virtual machine after a test has been run.
The Browse files/registry button opens the dialog displayed in section 4.6.
4.5. Running manual control tasks
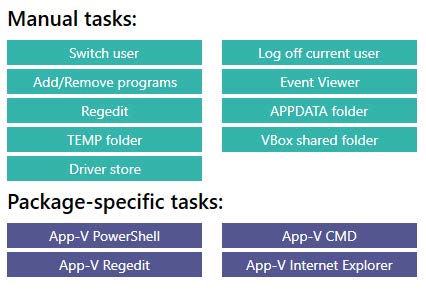
The manual control tasks are a range of tasks that can be run on demand inside the virtual machine. These
can be useful for having a range of shortcuts to utilities and relevant items in the virtual machine without
having to maintain a list of items inside the machine itself.
The manual tasks can be edited in Settings -> Edit manual control tasks.
Simply click on a task button in order to execute the task in the current virtual machine.
The Package-specific tasks are tasks that cannot be edited and are specific to the currently loaded
package. Some types of packages do not have any tasks, and the quantity of tasks varies per package.
4.6. Using the Guest file/registry browser/application overview window
To open the Guest browser window, select Actions -> Browse files/registry in VM… from the menu or
click the Browse button in the manual control area.
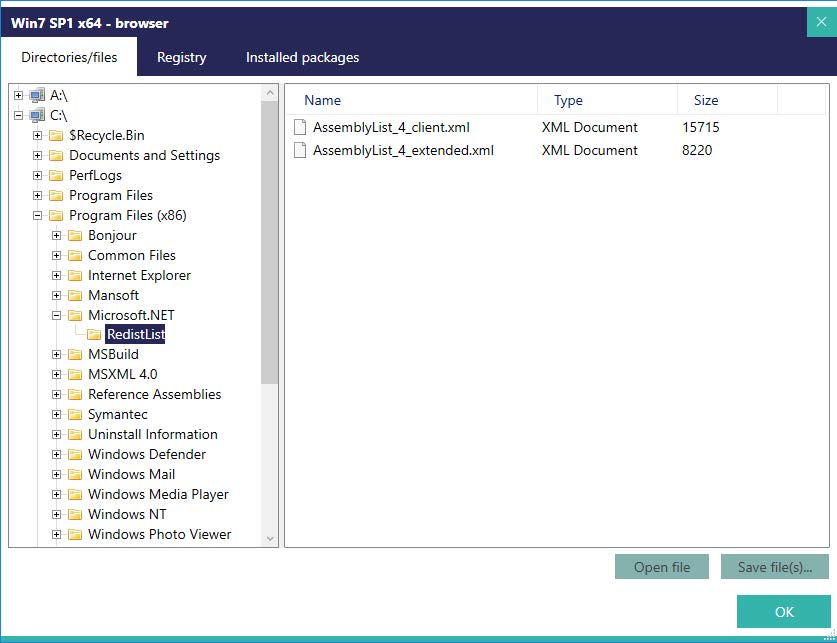
The Directories/files view displays a list of directories to the right, and a list of
files/directories in the select directory to the right. The Save file(s) button can be used to export
files from the Guest VM to the host PC.
Files can also be dragged from the window to the host machine.
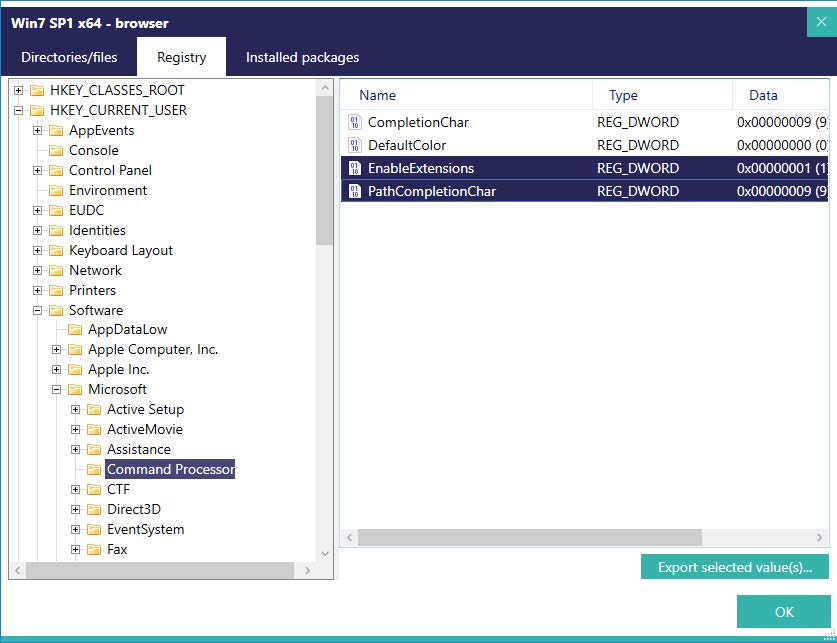
The Registry view displays the registry keys and values in the Guest VM.
Values can be exported by selecting them in the list and using the Export selected value(s)… button.
To export an entire registry key, right-click the key in the list and select Export key.
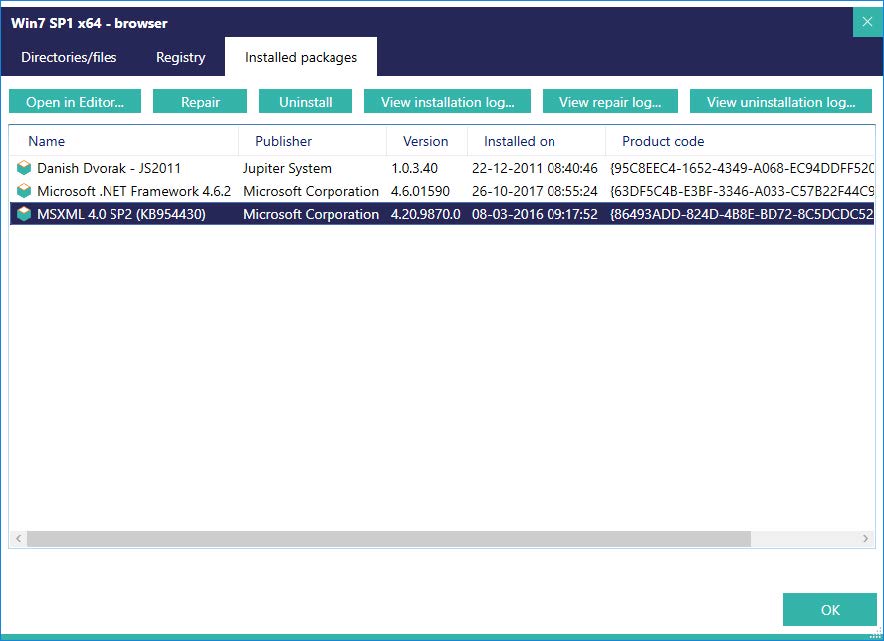
The Installed packages view is similar to what can be found in Programs and Features in the control
panel.
The list only contains MSI packages, but it contains all installed MSI packages for the machine, even if
they do not show up in the Add/Remove Programs list.
The Open in Editor button copies the MSI package from the virtual machine and opens it in Smart
Package Editor.
The Repair button runs a repair for the selected package(s), and copies the log file to the host PC.
The log file can then be viewed by using the View repair log… button.
The Uninstall button removes the selected package(s) and copies the log file to the host PC. The log
file can then be viewed by using the View uninstallation log… button.
The View installation log… button searches the virtual machine for a log file that matches the
product code of the selected package, and opens it if it was found.
The context menu for the packages have more options:
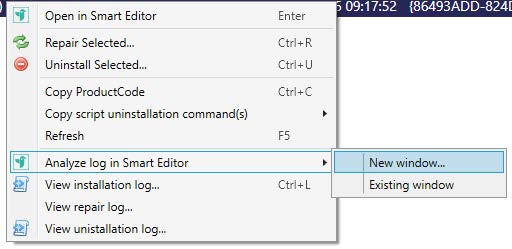
Analyze log in Smart Editor attempts to find a log file for the selected package and open it for
analysis. New window will copy the package out from the VM and load a new instance of Smart Editor.
Usually what you will want to do is load the log file into an existing open instance of Smart Editor, which
is done by selecting the Existing window option.
NOTE: The log will open in the first instance of Smart Editor that was opened on the PC. To be certain
the log file ends up in the instance you want, only have one instance of the editor running while using
this function.